
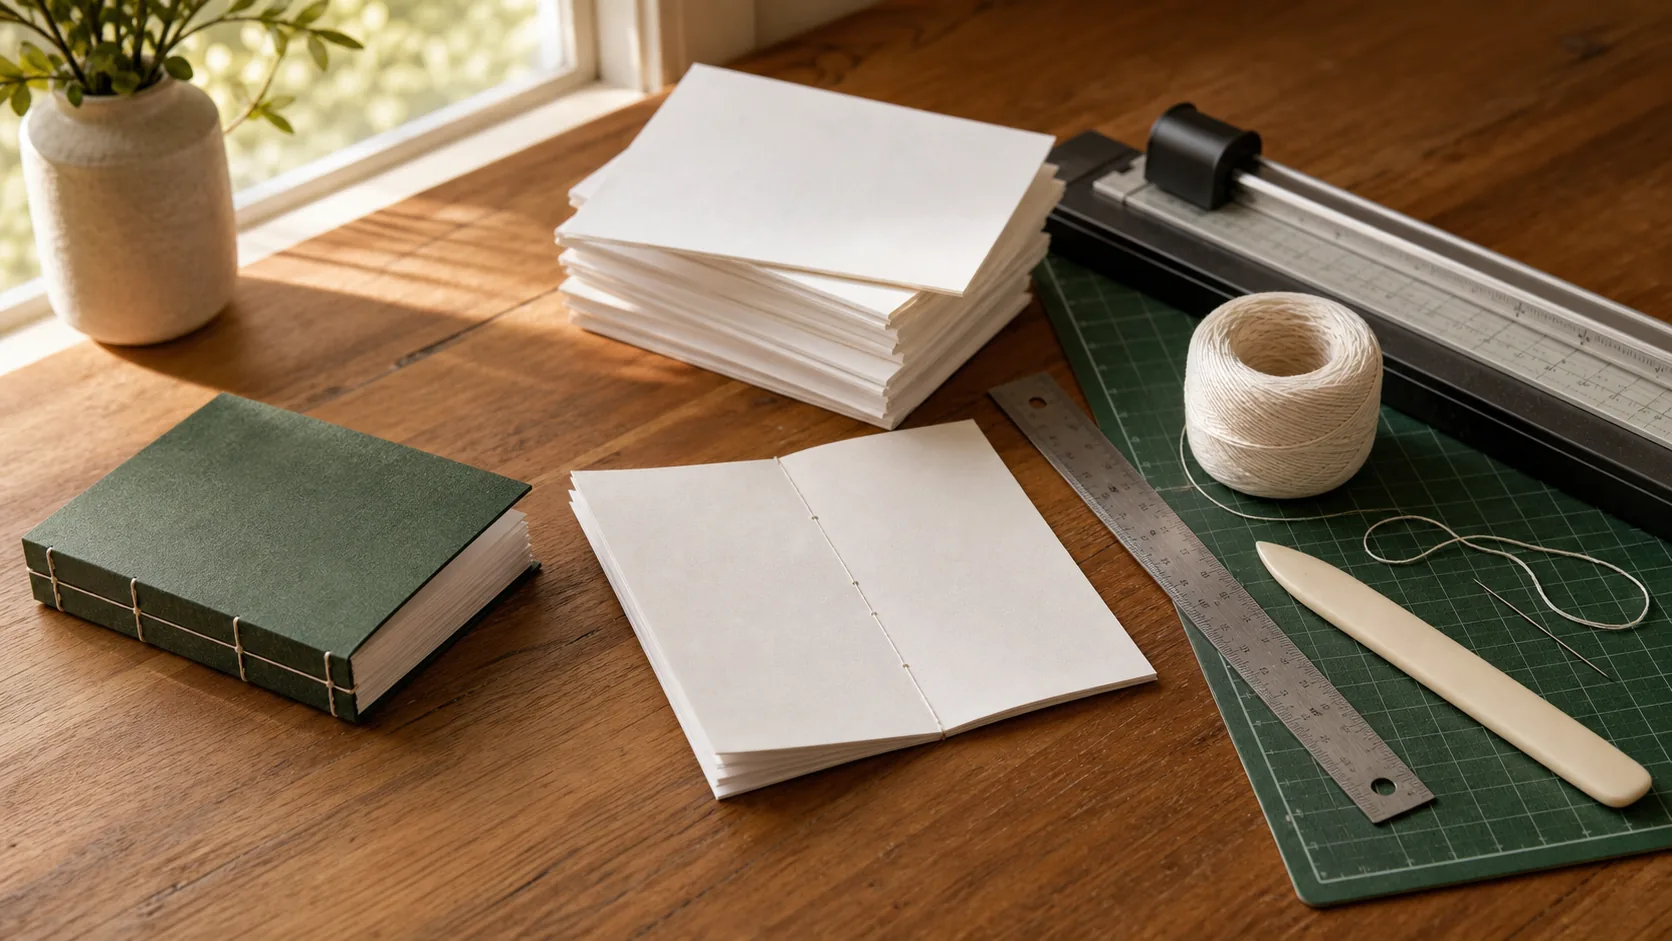
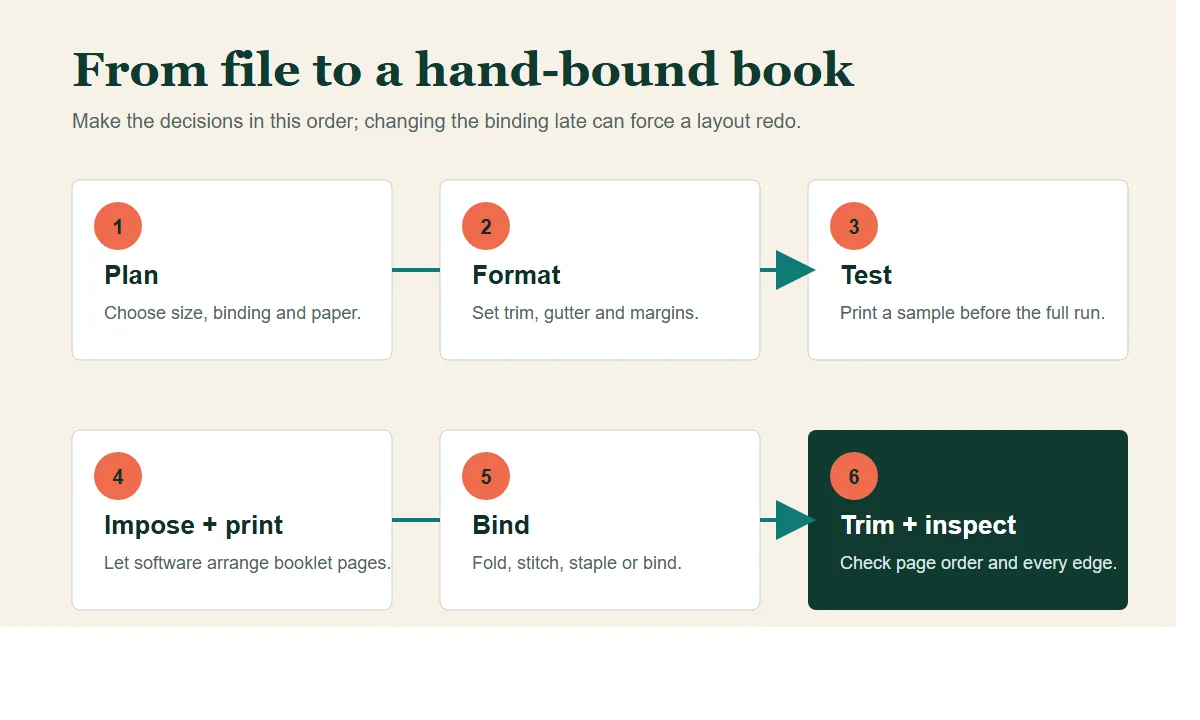
You can print and bind a book at home if you first choose the finished size and binding, format the pages for that method, make a test print, let Word or Acrobat arrange booklet pages, print double-sided, then fold, bind and trim. It works best for prototypes, zines and simple booklets. A handmade binding is not the same product as a factory-made hardcover.
This guide was prompted by BlueprintDIY’s detailed video, How to Print Your Book on a Budget. The video demonstrates a small-scale workflow for covers, creasing, double-sided page organization, printing, cutting and binding. The discussion below the video also reveals the questions that stop many first-time makers: Which page goes on the back of which? What does the equipment cost? How do margins work? And will the result feel like a real book?
The steps below answer those questions without assuming you own the creator’s exact machines. They also separate three products that are often confused: a folded booklet, a hand-bound craft book, and a professionally manufactured hardcover.
What do you need to print and bind a book at home?
For a basic folded or hand-bound book, gather:
- a finished manuscript in Word or PDF;
- a printer that supports reliable double-sided printing—or a manual duplex workflow;
- paper that your printer can feed consistently;
- heavier paper or cardstock if you want a simple cover;
- a ruler, cutting mat and sharp craft knife or a paper trimmer;
- a bone folder or another smooth creasing tool;
- a long-reach stapler, needle and thread, or a compatible binding machine;
- scrap paper for testing.
You do not need every tool shown in one tutorial. Start with the binding method you can actually complete safely. A booklet can be folded and saddle-stitched. A slim text block can be hand-sewn. A thermal or strip binding needs the corresponding machine and supplies. Each method produces a different object.
Plan the binding first. Red River Paper’s home bookmaking guide makes the same practical point: binding affects the document setup, margins, durability and whether the book lies flat. Choosing it after printing is one of the fastest ways to waste a stack of pages.
Step 1: Decide what kind of book you are making
Write down four decisions before opening the print dialog:
- Finished size: for example, half-letter or A5.
- Binding: folded and stapled, sewn, thermal, comb, strip, or another method.
- Color: black-and-white interior, full color, or a mixture your printer can handle consistently.
- Purpose: prototype, workbook, coloring book, keepsake, gift or durable reading copy.
The purpose matters. If you want to learn a craft or test a layout, visible stitching and small variations may be part of the charm. If the book will be handled repeatedly by a child, given as a wedding or memorial gift, or expected to look like a retail hardcover, durability and finish become more important than making every step yourself.
Step 2: Set the page size, margins and gutter
Set the document to the intended page size before doing detailed layout work. A gutter is the extra inside margin that keeps words and pictures from disappearing into the binding. The thicker the book and the less freely it opens, the more carefully that inside space must be planned.
If you are working in Microsoft Word, its official Book Fold instructions use Layout → Margins → Custom Margins → Multiple pages → Book fold. Word changes the document orientation and treats the final page as half the width of the paper. Microsoft recommends planning this layout before writing when possible, because changing an established document can move tables, images and other objects.
Keep page numbers, faces, captions and important artwork comfortably away from trim edges and the gutter. If artwork should run to the very edge of a commercially trimmed page, it normally needs bleed. Many home printers cannot print true edge-to-edge, so a home project may instead use an intentional white border and trim it consistently.
Step 3: Prepare images, fonts and the cover
Use the highest-quality original images you have. A picture that looks sharp on a phone can look soft when enlarged on paper. Check every spread at the size it will be printed, not only while zoomed out on screen.
For a PDF workflow, export a fresh PDF after the layout is final and open that exported file to inspect it. Check for substituted fonts, shifted line breaks, missing illustrations and unexpected blank pages. If you are printing a booklet, keep the file in normal reading order; the print software should do the page imposition later.
A simple home cover can be a folded sheet of heavier stock. A manufactured hardcover is more complex: front, spine and back dimensions depend on the final page count, paper and production system. Do not assume a single front-cover image is a press-ready hardcover wrap.
Step 4: Make a short test print
Before printing the complete book, make a test using four to eight representative pages. Include:
- a page with small text;
- a dark image and a light image;
- a page with content near the gutter;
- a spread where left and right pages must pair correctly;
- a blank page if your book contains one intentionally.
Fold the sample exactly as you will fold the final book. Confirm that the top and bottom are oriented correctly, the back side is not upside down, and the page order still makes sense after folding. This small test is cheaper than diagnosing a wrong duplex setting after the entire book is printed.
Step 5: Arrange pages for booklet printing
The technical name for rearranging pages so they read correctly after folding is imposition. It is the source of much of the page-order confusion in DIY bookmaking.
Do not manually drag pages into a pattern unless you have a specific reason and have tested it. Adobe Acrobat’s official booklet printing guide can arrange PDF pages automatically for two-sided or manual front-and-back printing. Word’s Book Fold layout also prepares booklet order.
For a saddle-stitched booklet made from folded sheets, the total page count normally needs to be divisible by four because each folded sheet creates four pages. Both Ken the Book Printer and Printkeg explain this rule and show why the first and last pages may appear together on a printer spread. Add deliberate blanks when necessary; do not let the printer invent them without your review.
Step 6: Print the interior double-sided
Choose the printer’s duplex setting that matches the way the sheet will be turned. “Flip on long edge” and “flip on short edge” are not interchangeable. The correct choice depends on orientation and folding direction, which is why the test print comes first.
If your printer does not support automatic duplex printing, Acrobat can guide a manual sequence: print one side, reload the sheets in the correct orientation, then print the reverse side. Mark one corner of a scrap sheet and run it through once to learn how your printer feeds and rotates paper.
Print at actual size unless the workflow deliberately calls for scaling. “Fit to page” can quietly shrink margins and alter the finished size. Let ink dry before stacking heavily printed color pages, and keep the order intact as pages leave the printer.
Step 7: Fold and crease the pages
For a folded booklet, align the sheet edges before making the crease. Press from the center outward with a bone folder rather than repeatedly rubbing the printed surface. Nest folded sheets in the correct sequence and check the page numbers again.
Longer books are often divided into smaller folded groups called signatures instead of forcing a thick stack into one fold. That is a real bookbinding technique, but it adds sewing, alignment and casing work. If this is your first project, make a thin booklet before attempting a thick multi-signature volume.
Step 8: Bind the book
Option A: Saddle stitch a thin booklet
Fold the sheets, nest them and staple through the center fold with a long-reach stapler. This is fast and suitable for slim booklets. It is not a hardcover and becomes less practical as the page count grows.
Option B: Sew a simple text block
Punch evenly spaced holes through the fold and sew with suitable thread. Keep the tension firm enough to hold the pages but not so tight that the paper tears. A stitched book can be attractive and durable for its scale, but consistent hole placement and square alignment take practice.
Option C: Use a binding machine
Thermal, strip, comb and other systems can speed repeated work, as the BlueprintDIY video illustrates with a strip-binding workflow. Check the machine’s supported page count, paper and consumables before buying it. The cheapest machine is not useful if it cannot bind the size and thickness you intend to make.
Whichever method you choose, follow the tool manufacturer’s safety instructions. Cutting blades, heated binders and punching machines are not suitable for unsupervised children.
Step 9: Trim and inspect the finished book
Trim only after the book is bound or assembled according to the chosen method. Work in light passes with a sharp blade and metal ruler, or use a cutter rated for the full stack. Trying to force too many sheets through a small trimmer can pull the pages out of square.
Then inspect the physical copy from beginning to end:
- Does the cover open in the correct direction?
- Are all pages present and in reading order?
- Are any pages upside down?
- Is text comfortably clear of the gutter and trim?
- Are images acceptably sharp and consistent?
- Does the binding hold when the book is opened normally?
- Are there exposed sharp staples, loose threads or lifted adhesive?
Treat the first copy as a proof. Write corrections down before changing the digital file so you do not lose track of what was a printing problem and what was a layout problem.
Step 10: Decide whether to remake it or outsource it
Finishing one DIY copy teaches you more than scrolling through dozens of tutorials. It can also reveal that the part you value is writing and designing—not calibrating printers, buying binding equipment or trimming stacks of paper. That is useful information, not a failure.
Is it cheaper to print and bind a book yourself?
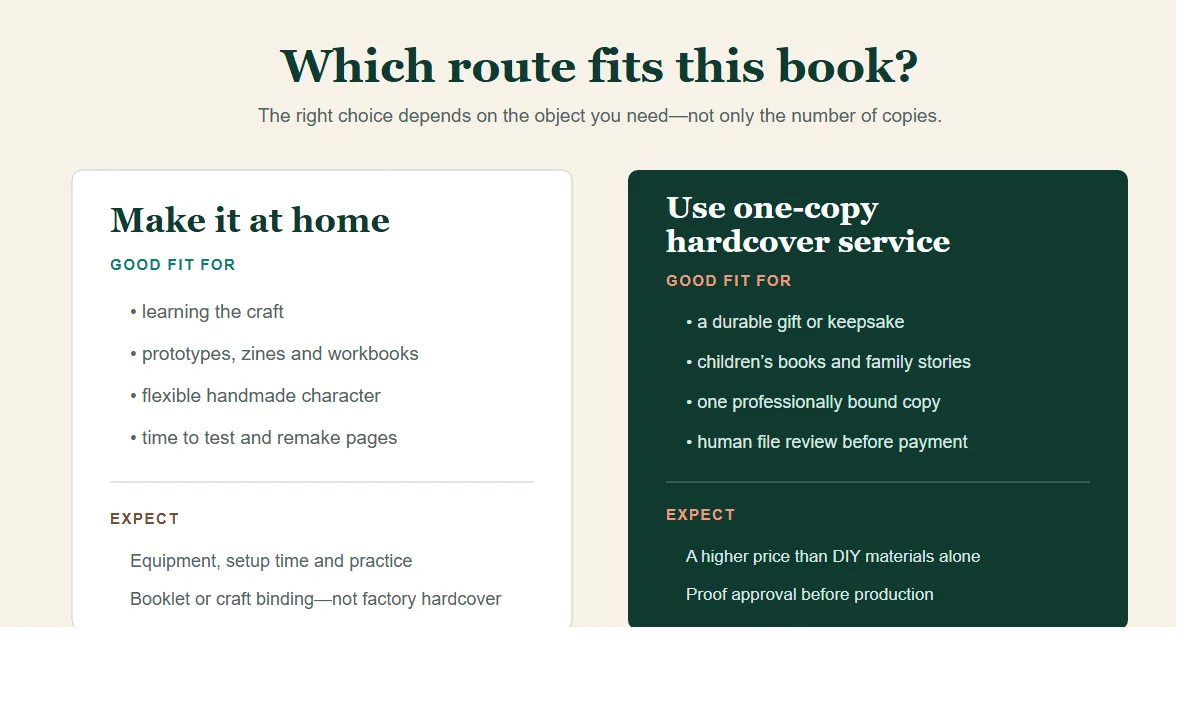
It can be cheaper when you already own a suitable printer and tools, accept a booklet or craft binding, and treat your time as part of the hobby. It may not be cheaper when you must buy equipment, replace failed prints, use a lot of color ink, or need a durable hardcover finish.
That is why a fair comparison uses the whole project: equipment, consumables, test prints, mistakes, labor, finish and delivery—not only paper and ink. Current supply prices vary too much by printer, country and binding method for one universal DIY total to be honest.
When is professional one-copy hardcover printing the better choice?
Consider professional production when you need:
- one durable hardcover rather than a folded booklet;
- a children’s story or family book that will be handled repeatedly;
- a polished gift, memorial, portfolio or presentation copy;
- help checking whether the file can be manufactured;
- a digital proof before the physical book is produced;
- one known service price instead of assembling tools and supplies.
YourBookBound is designed for that second route. You can upload the interior file you already have—PDF, DOC, DOCX or RTF—and an optional PDF, JPG or PNG cover. A human reviews it free before payment and explains the preparation included in the single $99 USD service. Technical corrections, layout and cover design or adjustment and spine setup are included. If you proceed, you pay once through a secure payment link using an available payment method, approve a digital proof, and receive one finished hardcover with standard tracked shipping included.
Common DIY bookmaking mistakes
Formatting before choosing the binding
The inside margin and page arrangement depend on how the book will be bound. Decide that first.
Manually rearranging page order too early
Keep the source file in reading order. Let Word or Acrobat impose booklet pages, then verify with a small test.
Printing the whole book before testing duplex orientation
One marked scrap sheet can show how the printer feeds paper. Four test pages can reveal an upside-down back.
Expecting a desktop printer to make a factory hardcover
A hand-bound book can be beautiful, but a wrapped hard case, spine construction, trimming and production tolerances require different materials and equipment.
Ignoring the final physical inspection
Screen review cannot reveal every feed mark, weak fold, rough edge or loose page. Always check the object you made.
Frequently asked questions
How do I print a book in Word?
Use Word’s Book Fold setting under Layout and Custom Margins, set an appropriate gutter, then test the printer’s duplex orientation. Word can arrange the pages for folding, so keep your document in normal reading order.
How do I arrange pages for booklet printing?
Use booklet printing in Word or Adobe Acrobat rather than manually reordering pages. A folded saddle-stitched booklet usually needs a page count divisible by four.
Can I bind a full-length novel at home?
Yes, but a thick book usually requires multiple signatures or specialized binding equipment. Start with a short prototype because page alignment, sewing, adhesive and trimming become harder as thickness increases.
Can I print one copy without publishing the book?
Yes. Printing a private copy is different from publishing or listing it for sale. Read our guide to printing a book for personal use without publishing.
Can a finished PDF become a hardcover?
Yes, after the file is checked for page size, margins, image quality, fonts, bleed and cover setup. Our PDF-to-one-copy hardcover guide explains the professional workflow.
Prefer one finished hardcover?
Send the file you have for a free human check.
No payment is taken at upload. We review the interior and optional cover, then explain the production plan for the $99 USD service. You decide whether to continue.
Sources reviewed: BlueprintDIY video and public discussion; Microsoft Word booklet guidance; Adobe Acrobat booklet printing; Red River Paper home bookmaking guide; Ken the Book Printer page arrangement guide; Printkeg booklet imposition guide; DocuCopies book printing guide. External procedures and product availability can change; sources were reviewed August 26, 2026.