
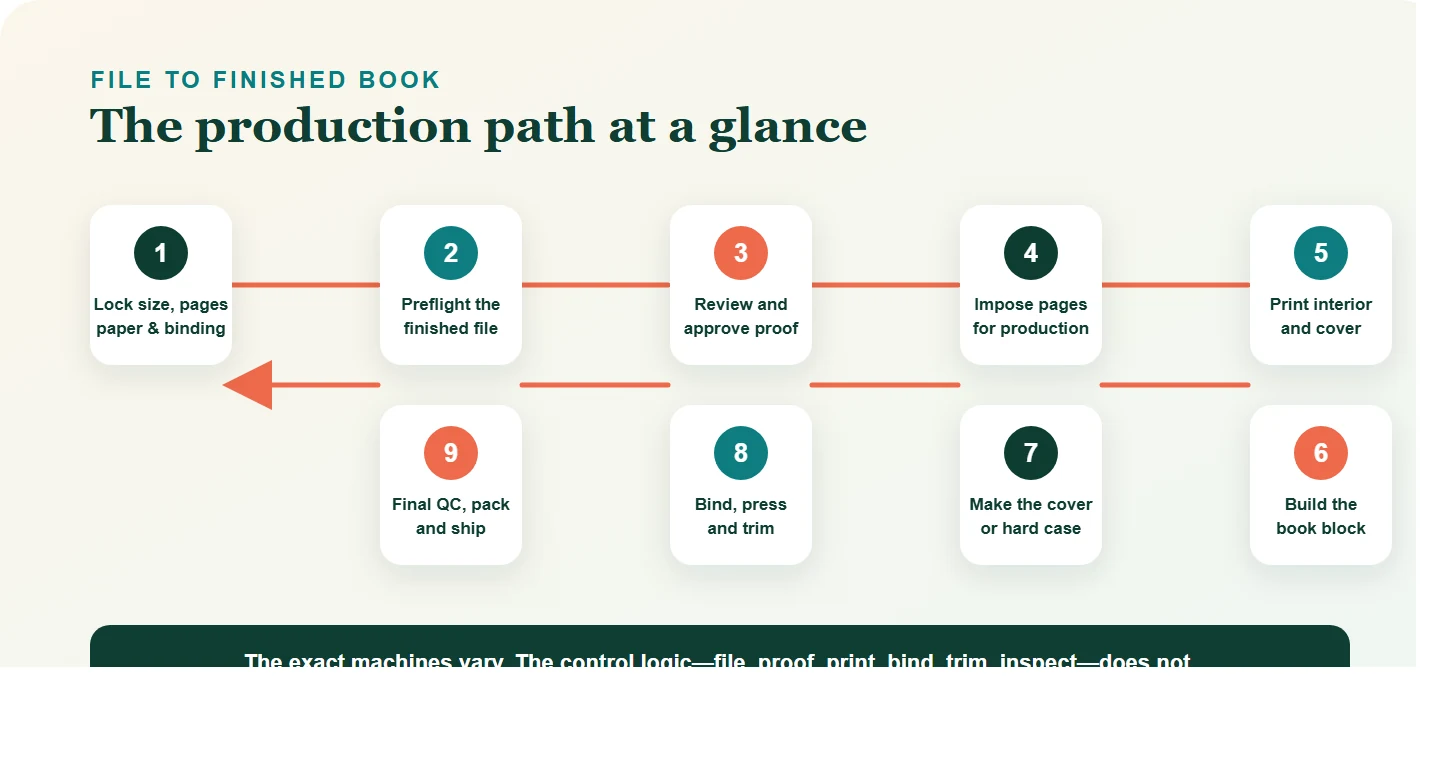
Books are made by checking a finished layout, arranging its pages for the press, printing the cover and interior, forming a book block, binding it, trimming it and inspecting the result. A perfect-bound paperback is glued into a flexible cover; a hardcover book block is attached to a rigid case. The exact machines vary, but the control sequence is remarkably consistent.

How are books printed and bound?
A commercial book begins as a finished set of pages, not as a pile of paper. The printer first locks the physical specification—trim size, page count, paper, cover and binding—because these choices affect the spine and cover geometry. The files are then checked for problems that could change the printed result.
After proof approval, production software arranges the pages on larger sheets. The interior and cover are printed, usually on different stocks. The pages are gathered into a book block. A flexible cover can be glued around that block for perfect binding, while a hardcover requires a separate rigid case and endsheets or another attachment method. The bound book is trimmed, inspected, packed and shipped.
That is the universal map. The machinery, inks, papers, adhesives and exact order of finishing steps vary by printer and by the kind of book being made.
How can a printer make only one copy?
The short answer is production digital printing. Offset printing transfers ink through plates and becomes economical when setup cost is spread across a large run. Digital printing sends page data directly into a production press, reducing the plate-making and make-ready burden for a very small quantity. HP describes digital printing as cost-effective for low volumes, and Canon markets current production systems for on-demand books down to a single copy.
That does not make one copy “the same price as one book from a 10,000-copy run.” The first copy still carries nearly all the job-specific work: file review, proofing, press setup, cover preparation, binding setup, trimming, quality control, packing and international fulfillment. Digital production makes one copy technically and commercially possible; it does not remove the fixed labor around it.
The useful mental model
You are not buying a few sheets of paper. You are buying a complete miniature production run whose output happens to be one finished book.
From digital file to finished book: the nine production stages
1. Lock the physical specification
Before the cover can be finalized, the printer needs the intended trim size, final page count, paper, color mode and binding style. These are not independent choices. A different paper changes the thickness of the book block; a different page count changes the spine; a hardcover adds boards, hinges, turn-ins and endsheets that do not exist in a paperback cover.
The source video shows the printer calculating a spine width from page count for one specific 60 lb stock. That example is useful because it reveals the dependency, but the formula is not universal. Paper caliper, coating, grain, printing method and binding construction all affect the final thickness. Use the template or calculation supplied for the actual production specification.
2. Preflight the finished file
Preflight asks a practical question: can this file survive printing, trimming and binding without losing meaning? The check normally covers page size and consistency, page count, image quality, font handling, transparency, missing assets, bleed, safe areas, gutter risk, page sequence and cover geometry.
Adobe’s PDF export documentation separates compression, marks and bleeds, color output, font embedding, transparency and PDF standards because each can change the manufactured result. Provider rules can also differ. For example, IngramSpark and Lulu ask for reader-order single pages and do not want printer marks in their print-on-demand interior files, while another commercial workflow may request a different preset. The safest instruction is always: follow the receiving printer’s current specification.
3. Generate and approve a proof
A proof is the decision gate between “editable project” and “manufacturing job.” It may be a digital proof, a physical proof, or both. It should confirm more than spelling. Page order, blank pages, crop, image position, gutter clearance, cover orientation and spine placement all need attention.
A screen cannot perfectly predict paper. A monitor emits light; a printed page reflects it. Paper shade, surface, ink or toner, lamination and lighting all influence the result. The proof is therefore where expectations become specific enough to approve.
4. Impose pages for the press
Your reading file is sequential: page 1, page 2, page 3 and so on. A press often prints several pages on a larger sheet, sometimes front and back, in an arrangement designed to land in the correct order after cutting and folding. That production arrangement is called imposition.
The video demonstrates two-up and other imposition options in printer-side software. This is a revealing production step, but it is normally not a customer task. If you rearrange pages into homemade printer spreads before upload, the receiving workflow may impose an already imposed file and create incorrect order, orientation or backs.
5. Print the interior and cover
Interior pages and covers have different jobs, so they are usually produced separately. The interior must turn reliably, reproduce text and artwork, and tolerate the chosen binding. The cover needs more structure and may receive lamination or another protective finish.
In the video, the printer uses particular digital presses, a coated-one-side cover stock and gloss lamination. Those are shop-specific decisions, not a rule for every book. A children’s picture book may use different paper weight, coating, surface and finish depending on color goals, page count, durability and budget.
6. Form the book block
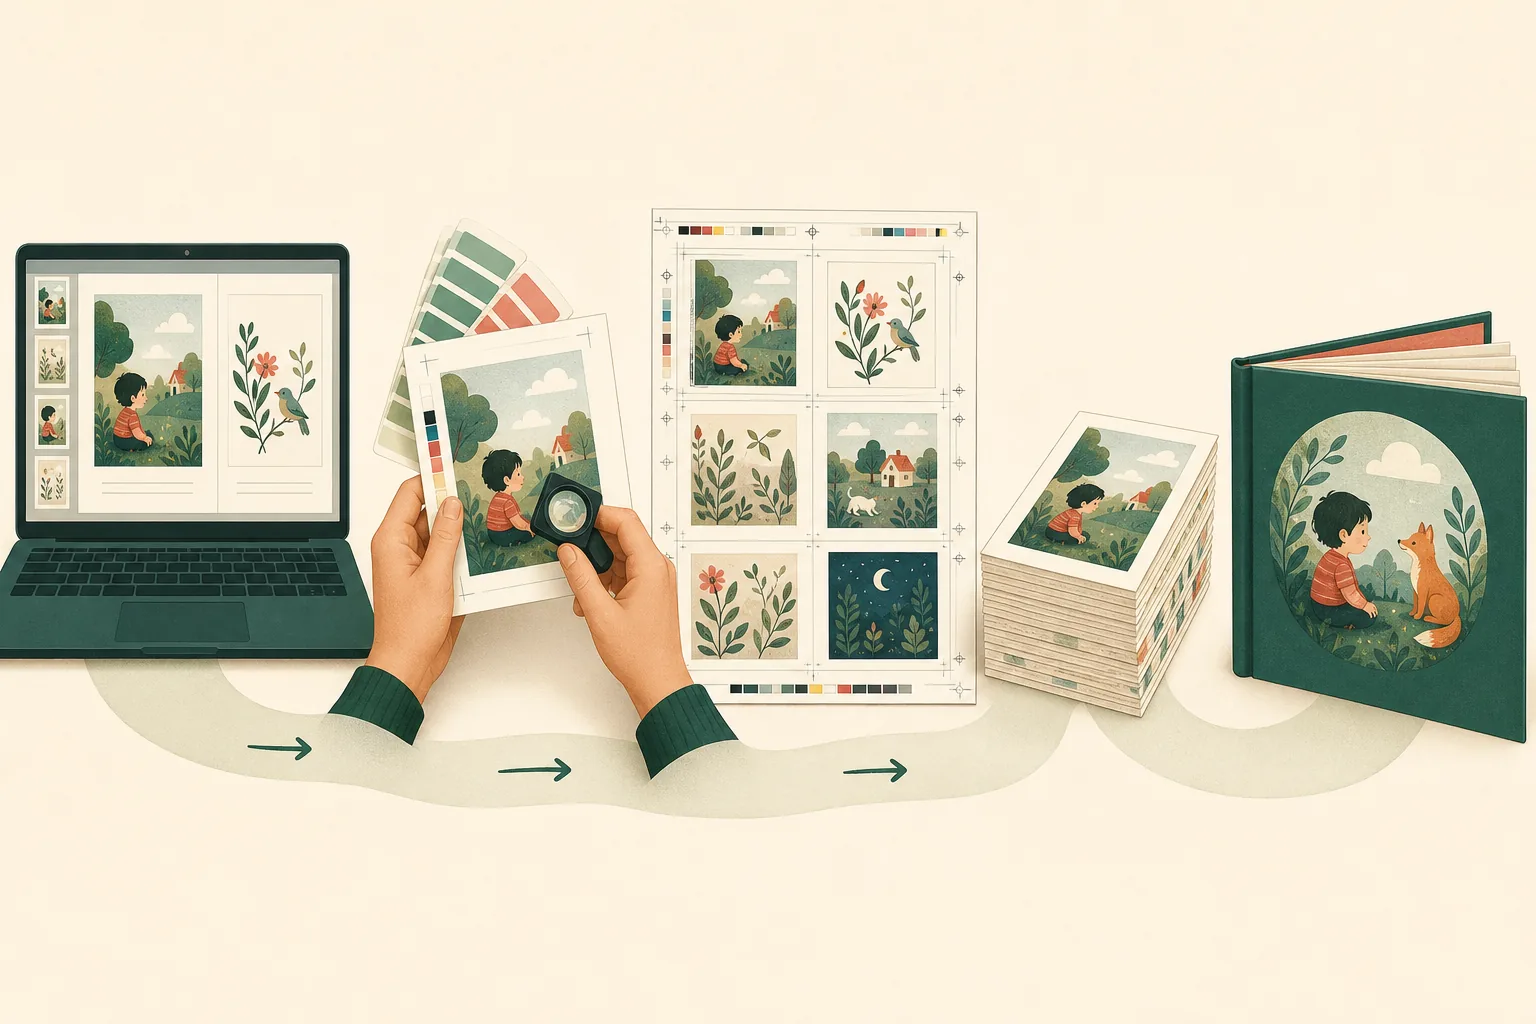
The printed interior must become one aligned body called a book block. Depending on the equipment and binding, printed sheets may be cut into individual leaves or folded into sections, then gathered in sequence. The block is jogged square and prepared at the spine so the chosen attachment can hold it securely.
This is where page order becomes physical. A beautiful cover cannot rescue a block with a duplicated page, an upside-down section or uneven alignment, which is why sequence checks appear more than once in a careful workflow.
7. Make the cover or hardcover case
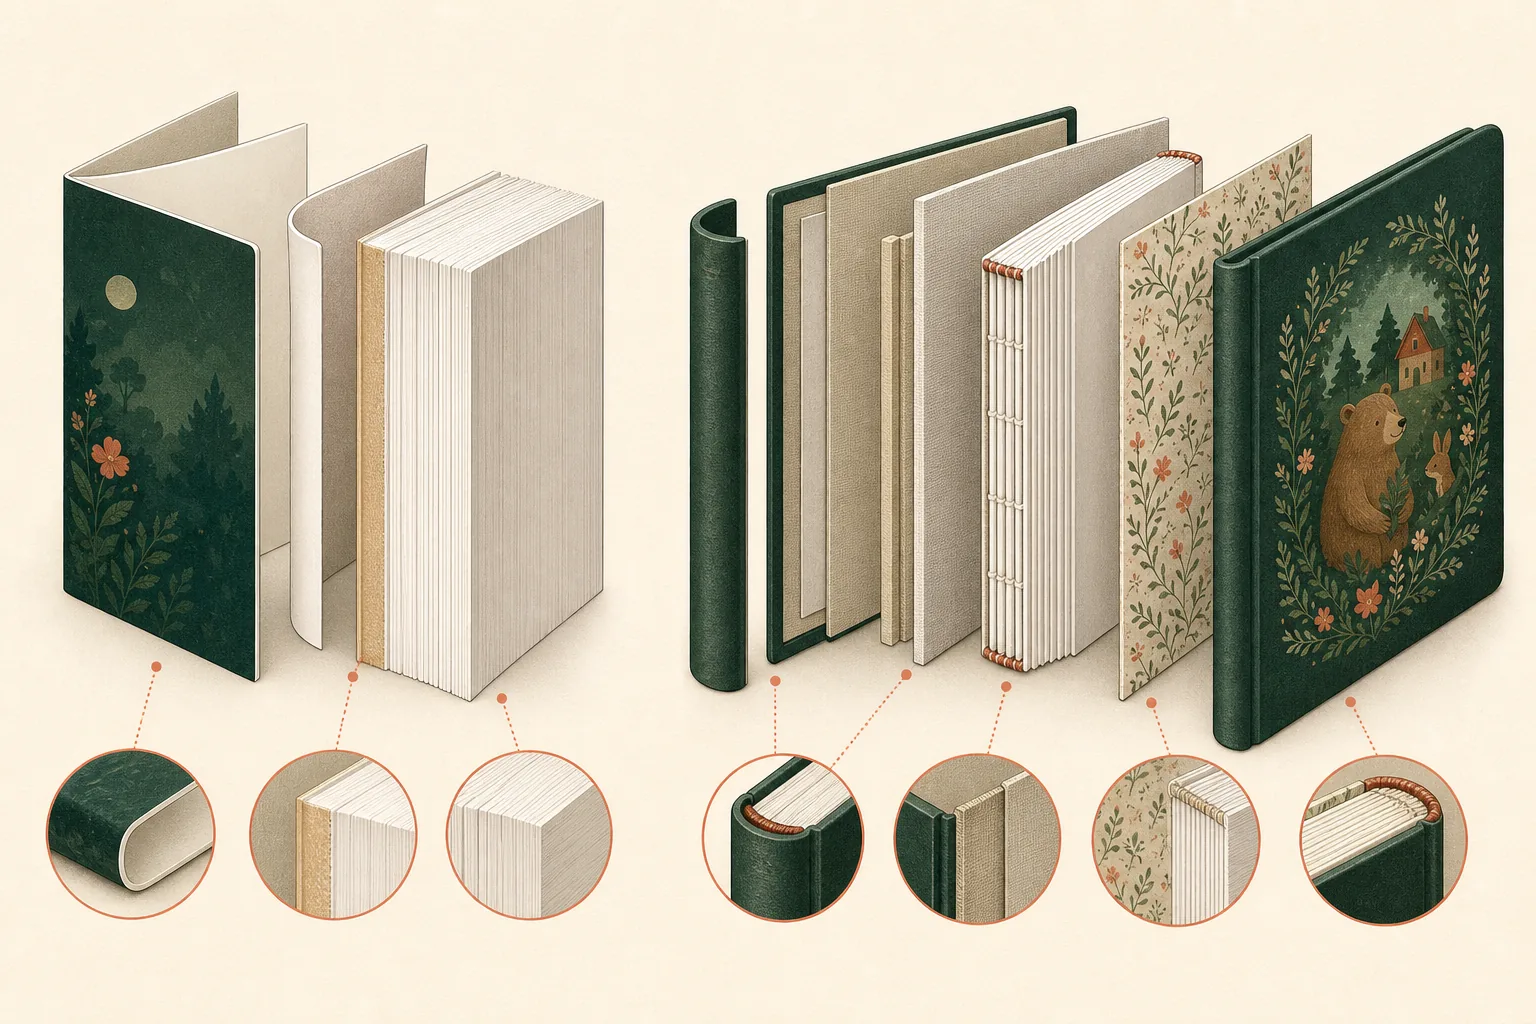
A perfect-bound paperback uses a flexible one-piece cover containing back, spine and front. It is printed, often finished, scored where needed and prepared to wrap around the spine.
A case-bound hardcover is more architectural. A printed wrap or cloth is applied around rigid front and back boards plus a spine component, leaving hinge areas that allow the cover to open. The book block is then attached to the case, commonly through endsheets. Hardcover templates therefore include geometry that a paperback cover does not.
8. Bind, press and trim
In the perfect-binding sequence shown in the video, the aligned block is clamped, its spine edge is prepared, adhesive is applied, the cover is positioned and pressure helps form the attachment. After the bond has stabilized sufficiently, a three-knife trimmer cuts the top, bottom and fore edge to the final size.
Hardcover production adds case making and casing-in. The precise attachment may be adhesive, sewn-and-glued, or another construction selected for the project. “Hardcover” describes the rigid outer case; it does not by itself guarantee one universal internal binding method.
9. Inspect, pack and ship
Final quality control should look for production defects that are visible only after binding: cover alignment, spine position, square trim, page sequence, loose pages, glue contamination, damaged corners, surface marks and obvious print artifacts. The finished copy must then be protected against abrasion, corner impact and moisture during transit.
For an international one-copy order, packaging and tracking are part of the product experience. A perfect book that arrives crushed is not a successful job.
Reader order is not printer order
This distinction solves one of the most common sources of confusion in book production.
| File layer | What it looks like | Who normally handles it |
|---|---|---|
| Reader-order interior | Single pages in sequence: 1, 2, 3, 4… | Author/designer supplies it |
| Reader spread | Two facing pages shown together for design review | Designer may use it while laying out |
| Printer imposition | Pages rearranged on a production sheet for cutting/folding | Printer or production software handles it |
| Cover spread | Back + spine + front, with provider-specific geometry | Designer prepares it from the printer’s template |
IngramSpark’s current guide, for example, requests one single-page interior PDF rather than two-up spreads. Lulu likewise describes its interior as a single-page layout while its cover is a one-piece spread. Those are provider-specific rules, but they illustrate the broader principle: do not guess the manufacturing arrangement.
Perfect-bound paperback versus case-bound hardcover
| Feature | Perfect-bound paperback | Case-bound hardcover |
|---|---|---|
| Outer structure | Flexible printed cover stock | Rigid boards wrapped with printed paper, cloth or another cover material |
| Cover geometry | Back, spine and front in one flexible spread | Back board, spine area, front board, hinges and wrap/turn-in areas |
| Book-block attachment | Spine edge is bonded into the cover | Book block is cased into the rigid cover, commonly with endsheets |
| Feel | Lighter and more flexible | More substantial, protective and gift-like |
| File implication | Spine depends on final block thickness | Spine plus board, hinge and wrap dimensions depend on the production template |
The video is excellent for seeing file preparation, digital printing, cover finishing, perfect binding and trimming in motion. It should not be used as proof that every hardcover follows the same adhesive or cover sequence. For YourBookBound customers, the important transferable lesson is the controlled handoff from approved file to accurately constructed book.
What should you prepare—and what should the printer handle?
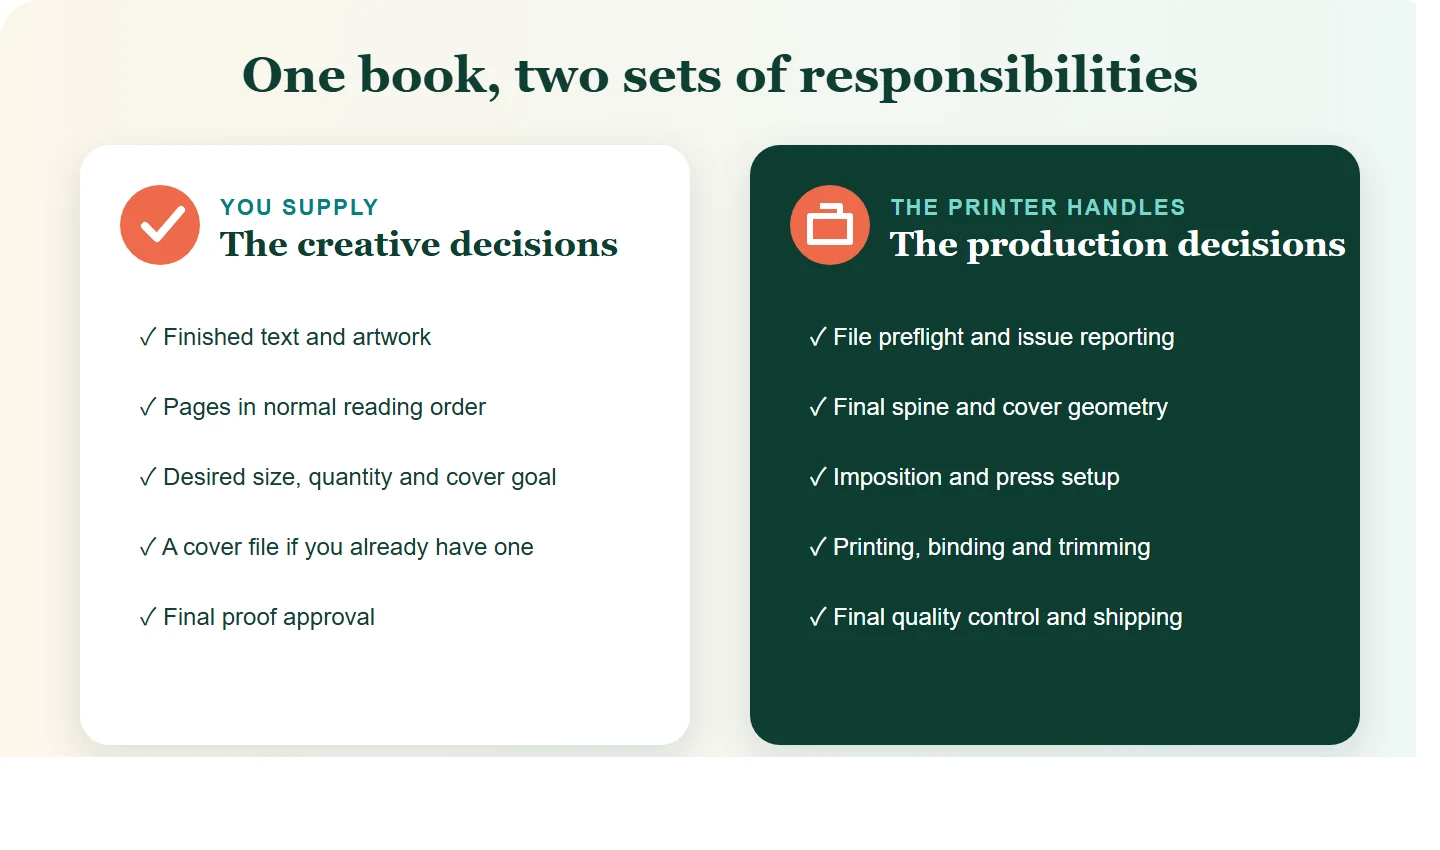
You should be ready to supply
- Your complete text and artwork in final reading order.
- The intended page size if it has already been chosen.
- Your final page count, including deliberate blank pages.
- A cover file if you have one—or a clear statement that you need help preparing it.
- Your preferred physical result: trim size, hardcover goal, quantity and delivery country.
- A careful approval after you receive the proof.
The printer should normally handle
- Preflight and a clear report of issues that could affect production.
- The final spine calculation and production-specific cover template.
- Imposition, press setup and production color handling.
- Paper sourcing, printing, cover finishing, binding and trimming.
- Finished-book quality control, protective packing and shipping.
You do not need a perfect PDF before asking for help
YourBookBound accepts a complete interior as PDF, DOC, DOCX or RTF for the initial file check. Export Canva pages as a PDF. If your pages are separate images, contact support for preparation advice before submitting. The purpose of the free human file check is to identify the production path and explain what needs attention. The file used for the press may ultimately be a fixed-layout print PDF, but you do not need to solve every technical step before contacting us.
Upload your finished content for a free file check—no payment is required at upload.
Make a one-page job ticket before you approve production
The production stages above explain what happens to a book. A job ticket makes the handoffs usable: it records the exact files, physical choices and approvals that belong together. You can prepare the customer side in a document or spreadsheet. Ask the printer to confirm the manufacturing fields instead of filling them with guesses.
The following fictional example is for a family-history hardcover. The paper identifier is deliberately unresolved: “uncoated” alone is not a complete stock specification. The ticket cannot be treated as ready for manufacture until the missing production details are confirmed.
| Field | Illustrative entry | Who confirms it |
|---|---|---|
| Project and use | River Street family history; private family reading | Customer |
| Interior identity | RiverStreet-interior-v07.pdf; 120 PDF pages, deliberate blanks included | Customer and file reviewer compare the actual file |
| Finished size | A5 portrait, 148 × 210 mm | Customer requests; printer confirms feasibility |
| Paper | Uncoated option preferred; exact stock/grammage awaiting confirmation | Printer, with customer agreement |
| Cover and construction | Hardcover requested; final template and internal attachment method awaiting confirmation | Printer |
| Cover identity | RiverStreet-cover-v04.pdf; must match confirmed interior and template | Designer and printer |
| Quantity and destination | One copy; destination country and full delivery details held in private order record | Customer and order team |
| Proof evidence | Digital proof pending; no physical proof reviewed | Customer records actual review |
| Timing | Desired gift date recorded; production and arrival estimates not yet confirmed | Printer confirms estimates; customer decides whether workable |
| Approval status | Hold: paper, template and proof unresolved | Named approver |
For your own ticket, add the exact proof filenames, version dates and approver once known. Keep delivery addresses and personal material in the private order record; they do not belong in a public project sample.
Know what each handoff has to prove
“The upload succeeded” proves that a file was transferred. It does not prove that its pages are printable. “The proof was sent” proves delivery of a review version. It does not prove approval. Use separate states so that silence is never mistaken for a decision.
- Received: someone can open the intended interior and cover; the file count is correct. If the cover is unfinished, record that rather than uploading a placeholder as final.
- Reviewed: production questions are listed with a next action and owner. A page-size warning remains open until the proposed treatment is agreed.
- Proof ready: the prepared interior and cover are available together. Confirm whether this is a digital-only review or whether a physical sample was separately arranged.
- Approved: the named customer has approved the identified versions and specification. No unacknowledged critical correction remains.
- In production: changes now need explicit confirmation from the production team. Sending a new PDF does not automatically replace the file already on press.
- Dispatched and received: tracking and delivery are separate events. Inspect the delivered object before treating the complete order as checked.
A late change needs an impact check
Suppose the family supplies eight extra pages after the 120-page proof is ready. The new interior has 128 pages, or 64 leaves instead of 60 in an ordinary duplex construction. That arithmetic does not tell you the new spine width. The printer still needs the chosen stock and construction.
Record a new interior version. Ask the designer to check contents and references, the printer to reconfirm cover geometry and the order team to confirm any effect on the production plan. Review a matched new interior and cover proof. Keep the old approval attached to the old versions; do not copy it forward automatically.
If production has started, first ask whether it can be paused or changed and what the consequences are. Do not assume that a text edit is free, instant or physically possible at every stage. An agreed decision may be to keep this copy and correct a later edition. The job ticket should show that decision without hiding the known error.
Inspect the delivered copy with the approved files beside it
Begin with non-destructive checks: title and orientation, first and last page, page sequence, visible cover damage and normal opening. Look at every page for missing or duplicated content. If you find an issue, record the PDF page number as well as any printed number.
Distinguish a file issue from an apparent production issue before describing it. If the wrong date is present in the approved proof and the book, that is different from a date that is correct in the proof but obscured by a print defect. You need not diagnose the machinery. A useful report says what was expected, what arrived and where to see it.
Order [reference], approved interior [filename]. PDF page [number], printed page [number]: expected [specific detail]; received [observable difference]. Attached are an overall photo, a close-up and the relevant approved-proof view. The packaging condition was [description]. Please review the appropriate next step.
Preserve the packaging and photos while the issue is reviewed, and follow the supplier’s current support procedure. Do not discard or destructively test the book to prove a problem. The report documents evidence; it does not promise that every concern qualifies for a free reprint.
The job ticket and change scenario here are original teaching tools. Blurb’s account of its own order workflow is useful comparative reading, but its factory network, automation statistics and binding practices are not descriptions of YourBookBound.
How to review a book proof like a production check
Do not review a proof only by asking, “Does it look good?” Use a fixed sequence so that visual excitement does not hide structural errors.

- Count and sequence: verify the first page, last page, all intentional blanks and every page transition.
- Orientation: confirm that portrait/landscape pages and rotated artwork are intentional.
- Trim: look for white hairlines at full-bleed edges and content that sits too close to a cut.
- Gutter: check that faces, small text and important artwork are not disappearing into the binding.
- Typography: inspect small text, line breaks, missing characters and any font substitution.
- Images: zoom in on illustrations, fine lines and gradients for pixelation or unexpected artifacts.
- Color: flag critical colors, but remember that the physical stock and finish influence the final appearance.
- Cover: confirm front/back orientation, title placement, hinge safety and spine alignment.
- Physical behavior: if reviewing a printed proof, open it normally and watch the gutter, page turn and cover movement.
- Approval record: send one consolidated correction list or explicit approval so there is a clear production version.
What changes for a children’s picture book?
The manufacturing stages stay the same, but the risk profile changes because illustrations often cross spreads and the finished book may be handled more forcefully.
- Faces and focal details: keep them away from the center fold or gutter unless the layout has been tested for the chosen binding.
- Full-bleed artwork: extend backgrounds beyond the trim as required by the printer rather than stopping exactly at the page edge.
- Small text: judge readability at the final physical size, not only while zoomed in on a monitor.
- Color consistency: evaluate recurring characters and skin tones across pages, not as isolated illustrations.
- Page order: check every reveal and page turn. A missing or duplicated spread can change the story.
- Durability: match paper, cover, corners and binding to the intended age, handling and keepsake purpose.
If your file is already a PDF, see our focused guide to printing one book from a PDF. If you are deciding between a home experiment and a finished result, read how to print and bind a book at home before choosing.
Five production mistakes this video helps explain
| Mistake | Why it happens | Better decision |
|---|---|---|
| Using a generic spine formula | It ignores the actual paper caliper and binding construction | Finalize page count and use the printer’s template |
| Uploading printer spreads | Reader layout is confused with production imposition | Supply normal reading-order pages unless told otherwise |
| Designing the cover too early | The interior specification is still changing | Lock trim, paper, page count and binding first |
| Approving a proof at a glance | Attention goes to artwork, not structure | Use a page-by-page proof checklist |
| Assuming every hardcover is sewn | Cover type is confused with book-block construction | Ask what internal binding method the provider uses |
The deeper lesson: quality is a chain, not one machine
A sharp press cannot repair missing bleed. A strong binding cannot correct page order. A perfect trim cannot move text out of the gutter. And a beautiful proof does not protect a book that is packed carelessly.
The best production workflows are designed around handoffs. Each stage receives something measurable from the previous stage and produces something that can be checked before the next stage begins. This is why a human file review and proof approval carry more value than their visible size in the process suggests: they stop cheap digital problems from becoming expensive physical problems.
For a one-copy project, that discipline matters even more. There is no long run in which a setup mistake can be amortized, and the one finished object may carry personal meaning that cannot be measured by unit cost alone.
ONE FILE. ONE PAYMENT. ONE REAL BOOK.
Your pages are finished. Let’s check whether they are ready to become a hardcover.
Send the complete interior as PDF, DOC, DOCX or RTF for a free human check. Each upload can be up to 100 MB; a separate cover is optional. We confirm the production plan before you decide whether to order. See the current file guide and pricing page for the service scope.
Frequently asked questions
Do I need to arrange my pages for printing?
No. Supply interior pages in normal reading order unless your chosen printer explicitly requests something different. Production imposition is normally handled by the printer after the file and specification are approved.
How is the spine width calculated?
Spine width depends on the final page count, the caliper of the actual paper and the binding construction. Do not rely on a generic formula copied from another printer. Finalize the interior and use the production provider’s template.
Is a perfect-bound book the same as a hardcover?
No. Perfect binding normally bonds a book block into a flexible wraparound cover. A case-bound hardcover uses rigid boards and a separate casing-in stage. A hardcover may use different internal book-block attachment methods, so ask the provider for the exact construction.
Can a printer make just one professional book?
Yes. Production digital printing and short-run finishing make a one-copy book possible. The price per copy is higher than a large offset run because file review, setup, binding, quality control and fulfillment still happen for that single copy.
Can I upload Word, Canva or image files instead of a PDF?
Submit a complete PDF, DOC, DOCX or RTF interior. Export Canva pages as a PDF; the interior uploader does not accept an editing link or separate JPG/PNG pages. Contact support if your pages are still separate images.
Why can printed color differ from my screen?
A monitor emits light, while paper reflects it. Screen brightness, color profile, ink or toner, paper shade, surface coating and cover finish all affect appearance. Use the proof to make an informed production decision rather than expecting an exact screen match.
Should I include crop marks?
Only if the receiving printer asks for them. Adobe recommends confirming the provider’s requirements, while print-on-demand services such as IngramSpark and Lulu specifically tell customers not to include printer marks in their standard interior files.
What is the difference between a digital proof and a physical proof?
A digital proof is efficient for page order, crop, layout and cover geometry. A physical proof also reveals paper feel, printed color, binding behavior, trim and finish. Which is appropriate depends on the service, budget and how color- or material-critical the project is.
Sources and further reading
- Just A Printer: Book Production From Start To Finish
- Adobe: PDF export options in InDesign
- Adobe: Set printer’s marks in InDesign
- IngramSpark: File Creation Guide
- Lulu: PDF Creation Settings
- HP: How Does Digital Printing Work?
- Canon: varioPRESS iV7 and on-demand book printing
- PrintNinja: Case Binding Process
Method note: Provider specifications are examples of real workflows, not universal dimensions. Always use the current file guide and cover template for the exact printer, paper and binding you choose.